

Taking on a DIY roofing project can be a great way to save money and take pride in your home improvement skills. But before you start, it's essential to be well-prepared. Here's a step-by-step guide to help you navigate your DIY roofing journey with confidence.
1. Start with Safety
Before anything else, make sure you have all the right tools and safety gear:
- Safety Gear: Gloves, non-slip shoes, a safety harness, and goggles are must-haves.
- Tools: Roofing hammer, utility knife, roofing nails, tape measure, chalk line, and a sturdy ladder.
2. Check Your Roof’s Condition
Start by giving your roof a thorough inspection. Look for any signs of damage, leaks, or wear that need fixing before you dive into the main project. Make sure the roof deck is solid and ready to go.
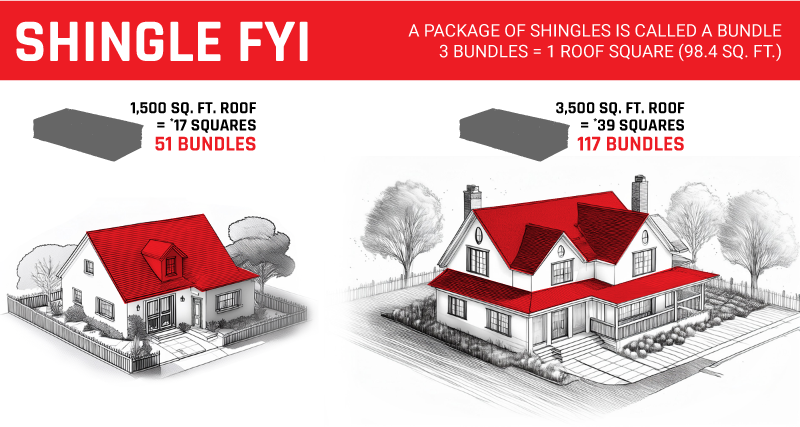
3. Get Your Measurements Right
Accurate measurements are key to a successful roofing project. Measure the length and width of each roof plane to calculate the total area. For extra precision, you might want to check out RoofScope’s aerial measurement tools—they can make this step much easier and more accurate.
4. Choose the Right Materials
Pick high-quality materials that fit your climate and the type of roof you have. Some popular options include:
- Asphalt Shingles: Affordable and straightforward to install.
- Metal Roofing: Durable and long-lasting.
- Tile: Attractive but heavier, which might require extra support.
5. Remove the Old Roof
Carefully take off the old roofing material. Start at the top and work your way down, removing shingles, nails, and the underlayment. Make sure to dispose of the old materials properly.
6. Install the Underlayment
Lay down the roofing underlayment over the roof deck. This layer adds extra protection against moisture. Start at the eaves and work your way up, making sure to overlap each layer as you go.
7. Add Flashing
Install flashing around any roof penetrations like chimneys, vents, and skylights. This helps keep water out of these vulnerable areas.
8. Install Shingles or Roofing Material
Begin installing your shingles or chosen roofing material, starting at the eaves and working your way up. Make sure each row is aligned and secured properly. Use a chalk line to keep the rows straight.
9. Ensure Proper Ventilation
Good ventilation is crucial for a long-lasting roof. Install ridge vents or other ventilation systems to allow air to flow and prevent heat and moisture buildup.
10. Final Inspection and Clean-Up
After everything is installed, take the time to inspect your work. Check for any loose shingles, nails, or areas that might need a touch-up. Clean up all debris and dispose of it responsibly.
11. Regular Maintenance
Keep your roof in top shape by doing regular inspections and cleanings. Look for any signs of damage or wear and fix them as soon as possible to extend your roof’s lifespan.
Conclusion
DIY roofing can be a rewarding project when done right. With the proper preparation, the right materials, and attention to detail, you can achieve results that you’ll be proud of. For accurate measurements and additional roofing tools, consider using RoofScope to help make your project a success.
DIY Roofing FAQs
What safety gear do I need for DIY roofing?
You’ll need gloves, non-slip shoes, a safety harness, and goggles to stay safe while working on your roof.
How do I measure my roof accurately?
Use a tape measure to get the length and width of each roof plane. For more precise measurements, consider using RoofScope’s aerial measurement technology.
What are the best roofing materials for a DIY project?
Asphalt shingles, metal roofing, and tile are great choices depending on your budget, climate, and the type of roof you have.
How often should I maintain my roof?
It’s a good idea to inspect and clean your roof at least twice a year to keep it in good condition.
written by RoofScope published on 08. 01. 2024